
(Image source: pixabay.com)
We’re no strangers to the image of old grandmas in a rocking chair, knitting needles flashing as they churn out piles and piles of sweaters in a cartoon, and neither are we strangers to the more terrifying image of Madame Defarge in Dickens’ A Tale of Two Cities, sitting behind the bar and knitting into her piece the name of John Barsad even as she talks to him.
The first time I read that book, I imagined the art of knitting to be as simple as looping wool over itself, and then thought that knitting the name of a person must have been as simple as needlework (spoiler: it’s really not, and needlework is a whole other ball game).
So here’s a quick guide to the art of knitting, which, fair warning, may result in an incurable desire to unravel old sweaters and try to put them back together again (please don’t, it’s a horrible task if you aren’t paying attention to stitches). Although it’s not a completely comprehensive explanation of the steps, it does outline the terminology you are likely to encounter, along with resources for further exploration.
Needles and Yarn:
The first thing you need to know is what needles and yarn you’re using. Different projects require different sizes, ranging from needles 1 mm in thickness to 10 mm, and yarn of single ply, two ply, and three ply. So instead of worrying your heads over that, the best thing to do is find basic, 4mm needles and the sort of wool you’d like to feel on your skin.
The thing is, with needles, you really need to make sure that they fit right in your hands. Using harder metal needles or stiff, thick needles can hurt your wrists, so it’s very important to find ones that lie loosely in your hands and are easily manoeuvrable. Personally, I use wooden circular needles – a pair of needles connected by a wire – but you can also go for separate wooden needles.
And there you have your needles and yarn, so you’re ready for the next step!
Casting on:
This is the first step of any work, and it basically means getting all your stitches on the needle. If you look at the hem of any knitted sweater, you’d see a neat row of loops that forms a closed edge without any seams. That’s the first, casted on row of any piece of knitting. This is also the hardest step, because this is where you need a lot of maths. I’m sorry, Humanities folks, but there’s a bit of maths in every fibre craft you pick up.
To cast on, you need to loop your wool onto the needle using slip knots – here’s a very simple tutorial to follow! Counting the number of stitches is very important, because the bottom row defines the initial size of your work. You could, of course, increase and decrease as and when required, but that would ruin the shape, so it’s imperative that the cast on stitches feel snug and not tight enough that slipping into a single stitch forces an entire loop to unravel and fall right off your needle (it has happened often enough to me that I live in dread of tight stitches).

(Image source: https://nickybarfoot.wordpress.com)
Knits and Purls:
Now that you have your first row, it’s time to start the actual knitting! Surprisingly enough, not all stitches are called knits. The two basic stitches in any piece of knitting are the knits and the purls. There’s one singular way to identify them in any fabric – knits lie flat and form the shape “v”, purls form bumps. This difference emerges because knits push the stitches backwards, and purls bring them to the front.
With your right needle, you go to the left of the stitch on the left needle for a knit, and to the right of the stitch on the left needle for a purl. Then, you pull the wool over and switch it to the right needle. Here’s a fun infographic to explain those steps:
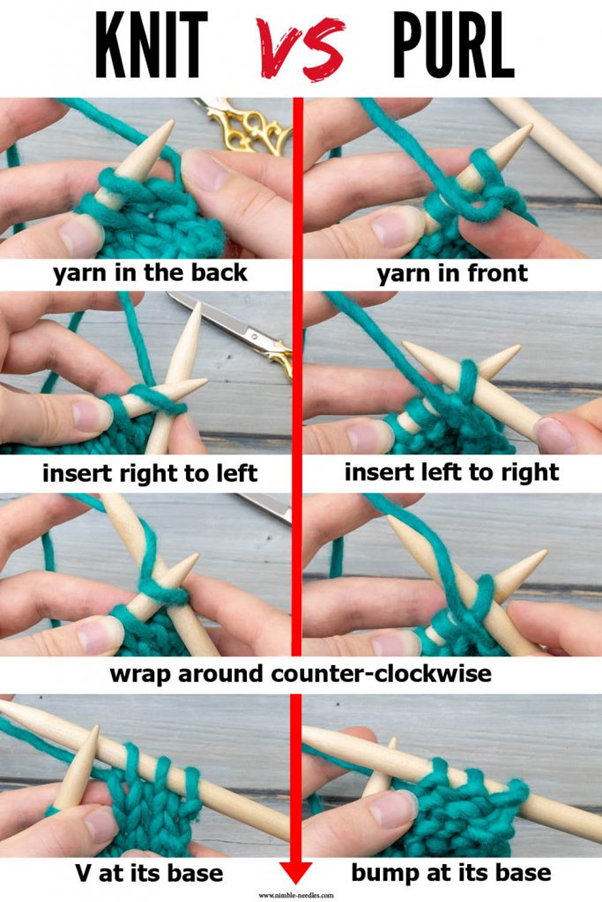
(Image source: : https://nimble-needles.com/tutorials/knit-vs-purl/)
And there you have it! The basic knits and purls form the first step for any other stitch you might want to learn, though I recommend sitting with the knits and purls until you can do them with your eyes closed so that you don’t forget which goes which way.
And finally, casting off! (yes, sort of like a ship leaving the shore)
When you cast off your stitches, you’re removing them from the needles and leaving them as free pieces of knitting that can survive in the wild (with care and maintenance of course). The casting off process is relatively simple – all you’re doing is pulling your stitches through each other until you’re left with a neat row of stitches that are chained to each other. Here’s a quick tutorial for that!

(Image source: https://weekendyarner.com/how-to-cast-off-when-knitting/)
And once you’ve cast off your work, you’ve successfully made a piece of knitting that can stand by itself and be worn and truly enjoyed by anyone who uses it.
Resources:
In case you’re looking for more resources and want to learn to knit, or find more patterns, these are the best places I’ve found, including, of course, all the image sources linked above:
1. RJ Knits (I learnt knitting here because of its easy tutorials!)
2. Nimble Needles (easy to follow tutorials and engaging FAQs)
3. Yarnspirations (free patterns and materials)
4. Magic Needles (good quality materials)
Knitting can grow to be a calming, peaceful activity, but it can also make you pick fights with balls of yarn, so be warned! But above all, I hope you can find the fun in the art and truly enjoy making your own little woolen creations.
Edited by Yatin
Design by Niranjana
